Welcome to DonorWise 2.0!
(DonorWise 2.0 was released in May 2010)
DonorWise 2.0 has several great new features and many enhancements to existing features. At the bottom are instructions on how to upgrade your database to DonorWise 2.0.
This table gives a brief synopsis of the many improvements in DonorWise 2.0. Following the table are the detailed descriptions of these items as found in the DonorWise Help.
Major new features
|
Bank Import to Multiple Designations
|
DonorWise 2.0 now makes it possible to have up to 10 designations per incoming gift.The bank import module is one of the most useful tools of DonorWise. In previous versions of DonorWise, when a donor's single gift was split to multiple designations, that gift had to be cross referenced to the SUSPENSE contact and manually corrected. Or a ministry had to use an Excel file as a reference.
|
Transfer Batches
|
Many ministries allow their staff members to transfer funds from one staff member or ministry designation to another. A Transfer batch is similar to a donation batch, but simply transfers funds from one responsibility centre to another.
|
Improvements to Designations
|
Import Designations
|
This feature enables you to load designations from an Excel file. This feature is most useful primarily when setting up a new DonorWise database, potentially saving hours of manual entry.
|
Designations highlighted in Current Group
|
To make it easier to pick out designations from your contact list, designations are now blue; other contacts remain black.
|
Ministry Path
|
To improve lookups and reporting, the Ministry Path replaces the former "Ministry Code" field. This makes it simpler to look up all designations under any branch in the Ministry Tree.
|
Ministry Tree Hyperlink
|
Double-click on any designation in the Ministry Tree and DonorWise will select that contact in the View Contacts screen.
|
Redirected Designations
|
When redirecting a designation, DonorWise now automatically redirects any previously-redirected designations to the designation that is the target of the current redirection. Prior to this version, you had to manually redirect any previously-redirected designations before you could redirect the current one.
|
Other new improvements
|
Tabs rearranged on View Contacts screen
|
The order of tabs on the View Contacts screen have been changed so that the most commonly-used tabs appear furthest to the left.
|
Current Period Display
|
At the bottom of the DonorWise window the current period is displayed. Clicking on that period opens the Periods and Closing screen.
|
Batch Item Count
|
To assist in completing a batch, the batch screen now keeps a running total of the number of items entered.
|
Reverse and Start Over Period
|
Reverse and Start Over is a powerful tool for correcting significant batch problems. Since these batches may often be from a previously closed period, DonorWise now allows you to select the posting period for the correction batch.
|
"Make a donor" now automated
|
The "Make a donor" button has been removed and that step is now done automatically when the Donor tab is selected while on a contact in the View Contacts screen.
|
"New Contact" link now worded consistently
|
This change corrects the labels for the many New Contact links and buttons. Now all are labeled "New Contact".
|
Add a New Contact from the Search Contacts box
|
You can now add a new contact directly from the Search box when entering a batch. Previously, you needed to search for a donor and if the donor was not in your database, you returned to the batch to create a new one (by pressing F6).
|
Select fields to export to Excel in Donation History
|
When exporting donation history (either from the Donation History screen, or from the Gifts Received tab in the View Contacts screen), you can now select the fields to export. Previously the export sent all columns (dozens of them) to Excel. Whatever fields you choose to export will save as a default for your next export.
|
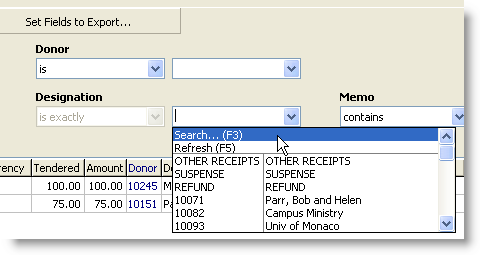
Use F3 to search for Designations in Donation History
|
This time-saving features makes it easy to find a designation in the Donation History screen instead of having to scroll through the drop-down list.
|
Donation Entry defaults
|
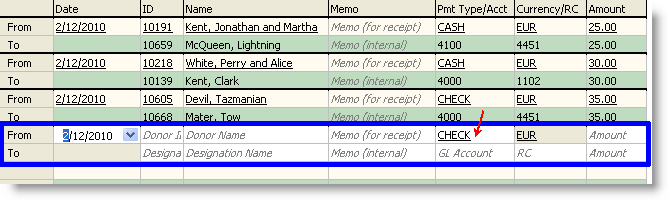
To reduce errors when entering batches, the batch entry screen now keeps the date and payment type of the row above instead of the default for the whole batch. This is especially helpful when payment types are entered together as groups (such as all cash before all cheques).
|
Preferred Address display
|
A very minor but helpful change, this feature enables you to see at a glance which address is a contact's preferred mailing address.
|
Donations Screen links updated
|
New
|
Old
|
|
|
|
Explore Batch box has 2 new options
|
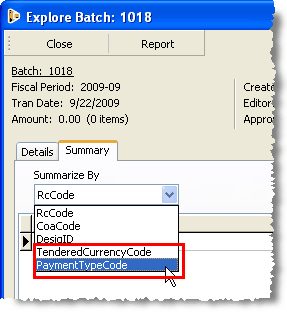
The Summary Tab on the Explore Batch screen now offers the selection of Payment Type and Tendered Currency as the means to group donations for review.
|
The following are snippets from the DonorWise Help manual describing each new feature and enhancement in greater detail.
(Note that when a reference is made to "Read More", the text is referring to further topics found in the DonorWise Help manual. You can access the Help by pressing F1 from within DonorWise.)
Bank Import to Multiple Designations
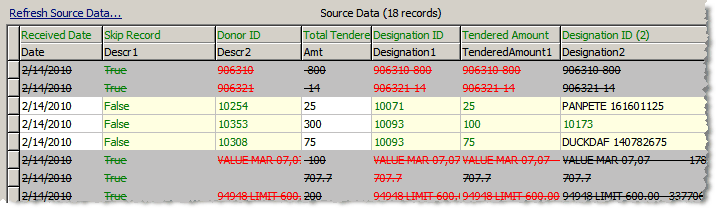
Donors will frequently give donations to more than one designation on a single gift. In DonorWise 2.0, you can now split a single incoming bank donation to up to 10 separate designations. The default number is 3.
Number of designations possible per row
Total Tendered Amount
Because a single row now contains multiple donations, the "amount" value for a row can now be used to define the "total" amount of the import. Using derived fields, you create multiple "tendered amount" columns (one for each designation). DonorWise will automatically match the individual designation totals to the Total Tendered Amount to make sure they are equal.
New method for Derived Fields
In previous versions of DonorWise, you typically had to create only one new derived field, to give you one field for the Donor ID and a duplicated one for Designation ID. Because you can now have multiple designations, you will need a new derived field for each Designation ID AND one for each amount.
Because donors can change their gift amounts and/or the number of designations, it is important for DonorWise to recognize when a donor changes their gift amount. (Before, this was not a concern because the specific amount was defined by the bank's amount on each row.) To ensure that DonorWise catches this change, you will want to make your new derived fields a combination of both the reference and the amount.
Because of the complexity of multiple designations, we recommend you review the Bank Import video available on the DonorWise web site. (Available after 13 May 2010.)
Example of columns for a multiple-designation import:
Column
|
Source from Bank File
|
Target Field in DonorWise
|
A
|
Date
|
Received date
|
B
|
Transaction type
|
Skip Record
|
C
|
Description
|
Donor ID
|
D
|
Amount
|
Total Tendered Amount
|
E
|
Description + Amount
|
Designation ID
|
F
|
Description + Amount
|
Tendered Amount
|
G
|
Description + Amount
|
Designation ID (2)
|
H
|
Description + Amount
|
Tendered Amount (2)
|
I
|
Description + Amount
|
Designation ID (3)
|
J
|
Description + Amount
|
Tendered Amount (3)
|
Wild Cards for unused designations
Because most donations will not use multiple designations, the Import Batch profile needs "Wild Cards" to overlook any field that has no data. Typically, these wild cards will be used in Designation 2 and above, both for the Designation ID and the Amount.
1.Press the <Edit Cross References> link.
You do need to be in the column for the desired cross reference. The Cross References box works for all fields; you select which field after opening.

2.Select the Field [in this case, Designation ID (2)]
3.Select the Pattern Style "Wild Cards".
4.In the "From" column enter an asterisk/star (*). Leave the "To" column blank.
5.Press the <Save> button.
6.Select the next field and repeat until all Wild Cards have been added.
7.Press the <Close> button.
In the Source Data grid, a Green value represents a valid cross-reference.
A black value represents a non-cross-referenced value that the import batch is ignoring. (For "Total Tendered Amount", black indicates that it is a valid numeric value, and all of the tendered amounts in that row will equal the Total Tendered Amount.)
This topic is available on video!
View > Video: Transfer Batches
Transfer Batches
Many ministries allow their staff members to transfer funds from one staff member or ministry designation to another. A Transfer batch is similar to a donation batch, but simply transfers funds from one responsibility centre to another. The main advantage of doing transfers inside of DonorWise instead of merely in the General ledger is that the staff and ministries will have a clear record of the donor contact information (name and address) and this information will flow to them through TntMPD and the Staff Portal.
Since account transfers are typically recurring and/or non-ending, most ministries keep the list of transfers in an Excel file. This Excel file can be exported to a .csv file and used to create an import transfer batch.
Read More > Creating a new Transfer Batch (Import)
Ways that a Transfer batch differs from a regular (Donation) batch:
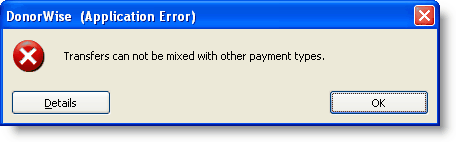
1.Transfers cannot be mixed with other payment types.
2.On the batch entry screen, the From: and To: lines are both designations. (In a normal batch, the From: line is a donor, and external funds are implied.). In this batch, both lines will use the Designation drop-down list for the Name search.

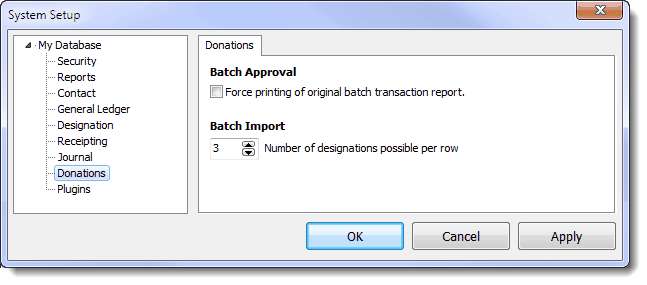
3.The Chart of Accounts used in the transaction will not appear in the batch entry rows. Only the receiving designation's responsibility center will appear. The Chart of Accounts is defined in the System Setup (shown below).
The option to allow transfers and the selection of the Chart of Account used for the transactions is controlled in the System Setup.
Read More > Journal Tab
Read More
Creating a new Transfer Batch (Manually)
Creating a new Transfer Batch (Import)
Designation improvements
DonorWise 2.0 has introduced many enhancements in how designations are viewed or managed.
Importing Designations
DonorWise 2.0 offers the ability to import designations. This saves a tremendous amount of time when creating a new database, but is also useful when creating multiple new designations such as when your ministry accepts many new staff, or you are assigning multiple designations for a project.
Read More > Import Designations
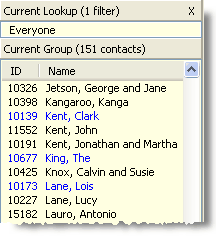
Designations highlighted in Current Group
Designations are colored blue to make them more obvious in the Current Group on the View Contacts screen.
Ministry Path
DonorWise displays the path from the Ministry Tree for designations and directors. In previous versions of DonorWise, this field only showed the actual ministry (tree branch), and the underlying field was the "Ministry Code". On the surface this change seems modest, but under the surface there are many great benefits to this new feature:
1.When exporting a contacts to Excel, this field shows the entire path. This can be helpful, especially with many designations.
2.When doing Lookups, it is easier to select all donations, donors, or directors under any particular tree branch.
3.Reports that have the Ministry as an option will soon use the Ministry Path instead.
4.Definitions created in TntMPD.DataServer will be able to use this Ministry Path also.
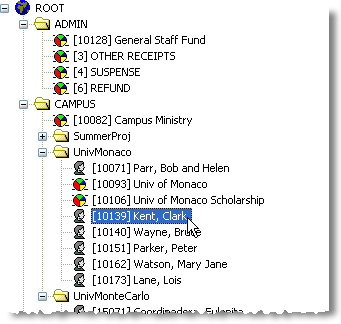
In this example, Clark Kent serves on the University of Monaco campus ministry. The ministry path is \ROOT\Campus Ministry\UMonaco.
You can see this path on the Designation Tab.
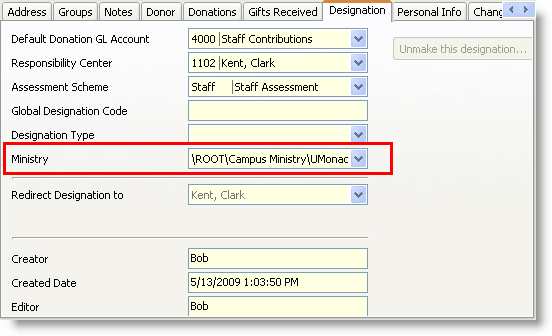
Designation Tab
The staff member or ministry's location on the tree is displayed in the <Ministry> box.
Old
|

|
New
|

|
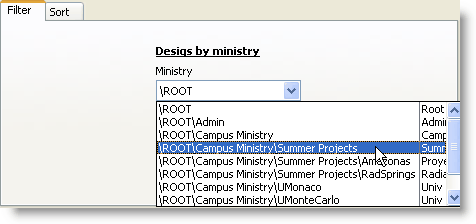
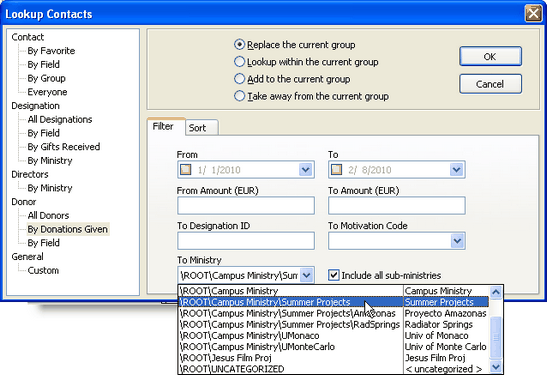
Lookup Designations by Ministry
When using a Lookup of donations, you can now lookup all designations by position on the Ministry Tree.
Lookup Directors by Ministry
When using a Lookup of directors, you can now lookup all directors by position on the Ministry Tree.

Lookup Donors by Donations
When using a Lookup of donors, you can now lookup all donors who gave to any designation within a ministry.
Reports
The Ministry Path will also be available as a criteria for certain reports when those reports are updated for DonorWise 2.0.
Ministry Tree hyperlink to designation
When you double-click on a designation in the Ministry Tree, DonorWise will take you to the View Contacts screen for that designation.
Redirected Designations
This section explains how DonorWise handles redirected designations when those designations have dependent designations. A dependent designation is one that is redirected. These automatic redirections are a new feature with DonorWise 2.0.
Redirection with dependent designations
When a designation is redirected, any designations that were redirected to the current designation will automatically be redirected to the new designation.
Importing gifts to redirected designations
When a donation is imported and the receiving designation is redirected, the gift will automatically be redirected to the new designation, responsibility centre, and chart of account.
Historical Batch
When the Historical Batch is imported, all designations will be imported as they appear in the file, even if they are redirected in DonorWise. Similarly, when the Historical Batch is edited, the designation will remain as entered, even if it is currently redirected. The assumption in both of these cases is that the designation was not redirected during the period the historical gift is referencing.
Tabs rearranged on View Contacts screen
The order of tabs on the View Contacts screen have been changed so that the most commonly-used tabs appear furthest to the left.

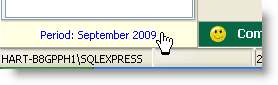
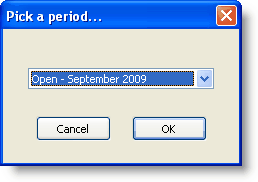
Current Period Display
The current period is displayed in the lower right corner of the DonorWise workspace. Clicking on the link will open the Periods and Closing screen.
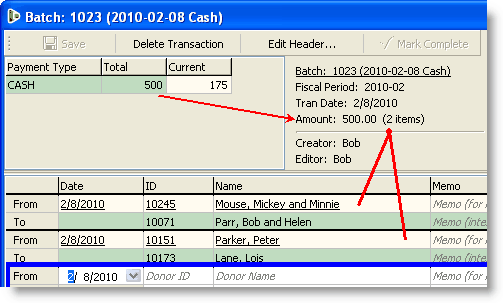
Batch Item Count
When entering a new batch, the header information in the upper right now contains the number of items entered. This helps in donation entry when there is a known number of items. The batch Amount shows the total for the batch; that amount does not change while rows are being entered, but the "Current" amount, or total amount entered so far, appears in the Payment Type table at the top.
Reverse and Start Over Period
When a Reverse and Start Over is performed, DonorWise will prompt you to select the period for the reversal.
"Make a donor" is now automated
A donor, by definition, is any contact which has given a gift to your ministry. In DonorWise, however, a contact will appear in a Donor lookup without having given a gift if their contact record is labeled as "Is Donor". In previous versions of DonorWise, this was done by pressing the <Make a donor> button. In DonorWise 2.0, this button was removed, and selecting the Donor tab performs the same action. If a contact is a designation, selecting the Donor tab will not automatically mark it as "Is a Donor".

The "Make a donor" button is no longer used.
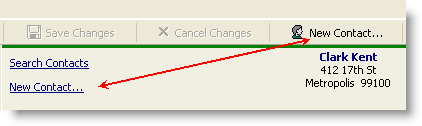
"New Contact" link now worded consistently
In previous versions of DonorWise, one link said "Create a Contact" while others said "New Contact". They are now consistent.
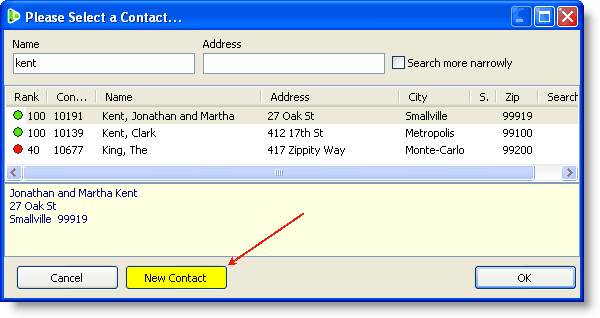
Add a New Contact from the Search Contacts box
Since you cannot know whether a contact is in your database while entering a batch, DonorWise 2.0 now allows you to search for a contact and add a new contact if the contact is not found.
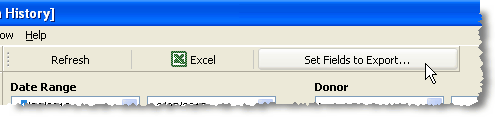
Select fields to export to Excel in Donation History
In previous versions of DonorWise, users could not choose which fields to export among the 50 exportable fields. DonorWise 2.0 offers the ability to select just the desired fields. You can <Check All> or <Uncheck All> by right-clicking in the list..
This applies to all donation history exports, whether you are exporting from the Donation History screen directly, or from an individual designation's Gifts Received tab in the View Contacts screen.

Use F3 to search for Designations in Donation History
Donation Entry defaults
Payment Type and Currency last entered are carried over to the current donation row. This is especially helpful when a batch contains multiple payment types.
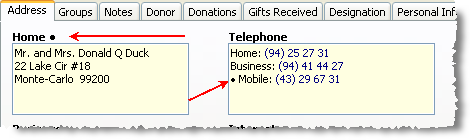
Preferred Address noted by a dot
The preferred mailing address and preferred telephone are identified by a dot on the Address Tab
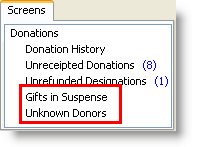
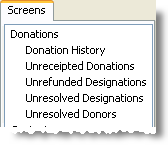
Donations Screen links updated
"Unresolved Designations" now appears as "Gifts in Suspense".
"Unresolved Donors" now appears as "Unknown Donors".
New
|
Old
|
|
|
Explore Batch box has 2 new options
The Summary Tab on the Explore Batch screen now offers the selection to summarize by Payment Type and Tendered Currency.
Upgrading to DonorWise 2.0
Note: Upgrading to DonorWise 2.0 is a one-way procedure. Once a database has been upgraded, it can no longer be opened in a previous version of DonorWise. For that reason, it is essential that you make a backup copy of your database prior to upgrading it to 2.0.
Upgrading to DonorWise 2.0
1.Make a backup copy of your DonorWise database prior to upgrading the software.
Read More > Backup Database
2.Upgrade DonorWise on all computers, including the network server and all users' client computers.
Option 1: Open DonorWise but press the <Cancel> button before logging in to your database. Then select
Option 2: Go to the DonorWise web site (http://www.tntware.com/donorwise/downloads) to download and install the latest version.
3.Open your DonorWise database in the current release. DonorWise will automatically upgrade the database to the current version. Once the database has been upgraded, it cannot be opened by an older version of DonorWise.
4.Notice that the Setup Tasks wizard will appear to the right of the screen. This indicates that there are new setup tasks to complete. Specifically, the Journal Tab in the System Setup needs to be updated to reflect the account(s) used for internal transfers.

Read More > Journal Tab
5.Select the account used to make internal transfers between designations. If you do not desire to use this feature in DonorWise, uncheck the internal transfers box and the journal account boxes will go gray. Press <OK> to accept the changes, and the Setup Tasks box will disappear.
