Import Batches
Bank Import
DonorWise can create batches using imported, comma-separated (.csv) files. These files will typically come from one of two sources:
Your Bank
|
Most ministries have some, if not all, of their contributions processed through the banking system. The bank then sends a file (or you download it) containing all of your transactions (donations, as well as other common items such as deposits, cheques, transfers, etc.).
Unlike a formatted .csv file import, your ministry typically has no control over how the bank prepares the information in the file they send to you or you download from the bank site. DonorWise can be taught to interpret a bank file when the bank information is consistent from month to month. Although the initial setup can be time-consuming, subsequent bank imports can be processed much more rapidly.
Initially the bank import process can seem confusing because your bank file contains non-donation data such as bills paid, payroll, non-donation deposits, service charges, etc.
|
Import Transaction Data
|
Most commonly used when a remote office processes donations locally and then sends a file to your office to upload into DonorWise. In a case like this, the remote office should prepare the file in such a way that DonorWise can import it with no changes by the DonorWise user (this reduces the likelihood of errors).
|
One of the best features of DonorWise is the ability to quickly import an existing bank file.
Overview of the Process
The steps are covered in greater detail in subsequent topics.
 Read more about the Import Profile
The Import Profile is what DonorWise uses to retain information about common imports. For example, if a bank sends you a file every month, and that file includes many of the same donors and designation numbers, the import profile will save you from having to look up each contact and designation every month.
The Import Profile remembers the following:
•Field mapping. The formatted fields from a particular bank and how they are mapped to DonorWise. •Cross References (your assignment of names to contacts and/or designation numbers) •Default Currency •Payment Type If you do not choose an Import Profile, DonorWise will automatically assign one, named "Last Import", which will be available the next time you import.
|
1.Create a new batch.
2.Fill out the Header information and select the file to import.
3.Match the file fields (column headers) to the appropriate DonorWise fields.
4.Add derived fields if necessary (to duplicate a column in the file, when that column contains two pieces of information).
5.Assign each row in the file to a donor and designation, or tell DonorWise to skip that row. This is called "cross-referencing".
6.Import the batch.
7.Mark complete and ready for approval
Import Batches
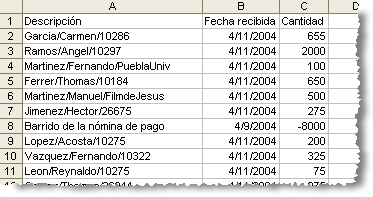
1.Open the bank file in Excel first to ensure that the information will load correctly. In this example, the bank information consists of just three fields: A date, a description, and a monetary amount.
2.Save the file as a .csv file (this is the only format which DonorWise can import).

3.In DonorWise, select New Batches from the Screens list.
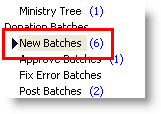
4.Press the <Import Batch> button.

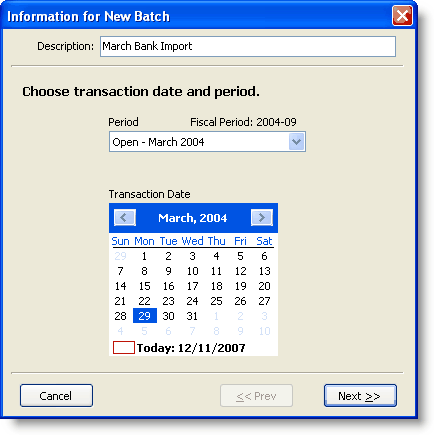
5.On the Information for New Batch dialog box, select the month to post this batch. You should write a Description to describe this batch. Press Next.
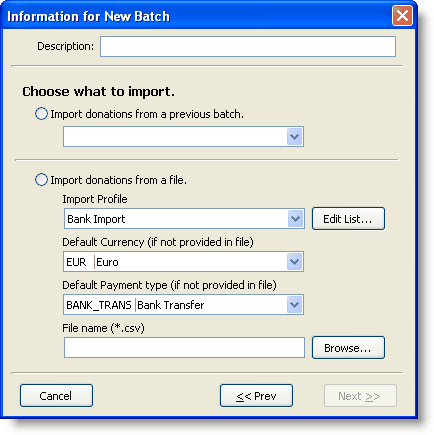
6.Fill out the information for the Import donations from a file section, then click Next.
7.Press the <Next> button.
Import Profile
|
Saves information about this type of file to make future imports easier.
|
Default Currency (if not provided in file)
|
The currency used in the file.
|
Default payment type (if not provided in file)
|
Bank Account Transfer
|
File name
|
Browse for the import file.
|
The Import Profile is what DonorWise uses to retain information about common imports. For example, if a bank sends you a file every month, and that file includes many of the same donors and designation numbers, the import profile will save you from having to look up each contact and designation every month.
The Import Profile remembers the following:
•Field mapping. The formatted fields from a particular bank and how they are mapped to DonorWise.
•Cross References (your assignment of names to contacts and/or designation numbers)
•Default Currency
•Payment Type
If you do not choose an Import Profile, DonorWise will automatically assign one, named "Last Import", which will be available the next time you import.
Bank Import to Multiple Designations
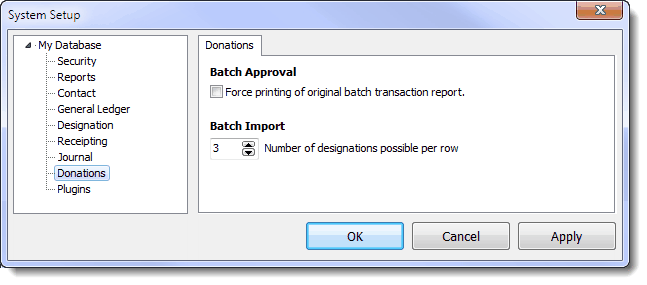
Donors will frequently give donations to more than one designation on a single gift. In DonorWise 2.0, you can now split a single incoming bank donation to up to 10 separate designations. The default number is 3.
Number of designations possible per row
Total Tendered Amount
Because a single row now contains multiple donations, the "amount" value for a row can now be used to define the "total" amount of the import. Using derived fields, you create multiple "tendered amount" columns (one for each designation). DonorWise will automatically match the individual designation totals to the Total Tendered Amount to make sure they are equal.
New method for Derived Fields
In previous versions of DonorWise, you typically had to create only one new derived field, to give you one field for the Donor ID and a duplicated one for Designation ID. Because you can now have multiple designations, you will need a new derived field for each Designation ID AND one for each amount.
Because donors can change their gift amounts and/or the number of designations, it is important for DonorWise to recognize when a donor changes their gift amount. (Before, this was not a concern because the specific amount was defined by the bank's amount on each row.) To ensure that DonorWise catches this change, you will want to make your new derived fields a combination of both the reference and the amount.
Because of the complexity of multiple designations, we recommend you review the Bank Import video available on the DonorWise web site. (Available after 13 May 2010.)
Example of columns for a multiple-designation import:
Column
|
Source from Bank File
|
Target Field in DonorWise
|
A
|
Date
|
Received date
|
B
|
Transaction type
|
Skip Record
|
C
|
Description
|
Donor ID
|
D
|
Amount
|
Total Tendered Amount
|
E
|
Description + Amount
|
Designation ID
|
F
|
Description + Amount
|
Tendered Amount
|
G
|
Description + Amount
|
Designation ID (2)
|
H
|
Description + Amount
|
Tendered Amount (2)
|
I
|
Description + Amount
|
Designation ID (3)
|
J
|
Description + Amount
|
Tendered Amount (3)
|
Wild Cards for unused designations
Because most donations will not use multiple designations, the Import Batch profile needs "Wild Cards" to overlook any field that has no data. Typically, these wild cards will be used in Designation 2 and above, both for the Designation ID and the Amount.
1.Press the <Edit Cross References> link.
You do need to be in the column for the desired cross reference. The Cross References box works for all fields; you select which field after opening.
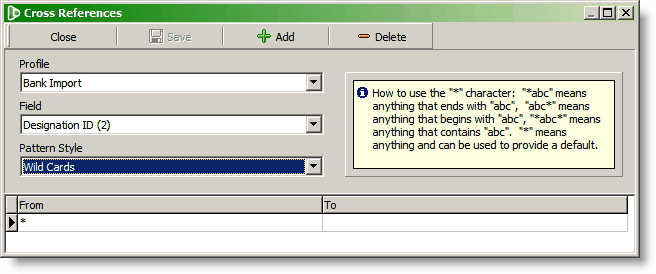
2.Select the Field [in this case, Designation ID (2)]
3.Select the Pattern Style "Wild Cards".
4.In the "From" column enter an asterisk/star (*). Leave the "To" column blank.
5.Press the <Save> button.
6.Select the next field and repeat until all Wild Cards have been added.
7.Press the <Close> button.
In the Source Data grid, a Green value represents a valid cross-reference.
A black value represents a non-cross-referenced value that the import batch is ignoring. (For "Total Tendered Amount", black indicates that it is a valid numeric value, and all of the tendered amounts in that row will equal the Total Tendered Amount.)

Read More > Import Batch Assignment