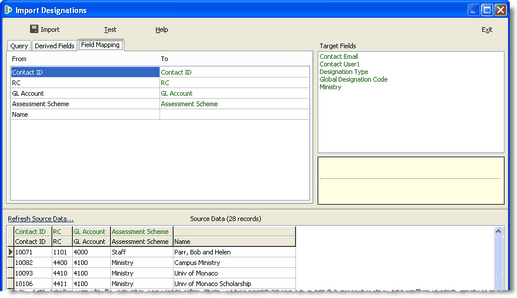
Import Designations
Designations can be created manually by selecting the contact and then associating that contact with an existing Responsibility Centre.
Read More > Creating / Editing a Designation
If you have many designations to add, it may be helpful to import them. There are two instances where importing designations may occur:
1.You are creating a new database and are importing all of your designations for the first time.
2.You are running a summer project or some other event and have a lot of new designation numbers.
There are two prerequisites for importing designations into your database:
1.The contacts must already exist in your database.
2.The responsibility centres must already exist in your database (whether your database is integrated with a General ledger or not).
Import Designations
1.Create an Excel file with your designations listed.
Required Fields: Contact ID and RC.
Optional for import but essential fields for processing donations: GL Account and Assessment Scheme.
Optional fields: Ministry Path (for Ministry Tree), Designation Type, Global Designation Code.

2.Save as a .csv text file

3.Select the menu item.
4.Select the .csv file
5.Match the Excel fields to the import Target fields. You do this by dragging the green name from the "Target Fields" box to the matching field name in the "From" column. Note that if the field name in your Excel file matches the target fields, DonorWise will automatically match them.

6.Press the <Test> button.
This tests your import to make sure all of the codes are valid.
7.Press the <Import> button.
This imports the designations. If the contact ID is not a designation already, DonorWise will make it into a designation. If the contact is already a designation, DonorWise will update any of the existing information with the newly imported information.