A campaign is any special ask effort. In fact, for many years Campaigns were called "Special Gift Appeals" because the feature was focused on the tasks and giving responses to a specific ask. Recent releases of TntConnect have significantly expanded the powerful features which led to the name change. A campaign can be so much more than just a "special gift appeal".
Creating and using campaigns is one of the more complex features of TntConnect, but it is also one of the best kept secrets. The easiest way to describe all of the appeals components and tasks is to walk you through an example of creating and using an appeal, including receiving and recording gifts.
Because campaigns can be complex, this help topic is intended to give an overview of the basic features but not be a comprehensive explanation.
Tutorial: Create and Use a Campaign
| 1. | Create the Campaign (). |


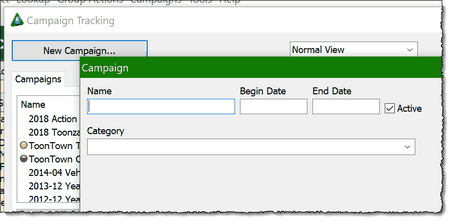
Note: You can also Inactivate a campaign by unchecking the Active box as shown above.
| 3. | Enter the name of your appeal; for easier sorting later, you may want to put the year and month first, such as "2013-12 Year-end Ask". (By default, TntConnect sorts campaigns by most recent activity, so that past campaigns do not show up at the top just because they are alphabetical.) |
Note: The Campaign box has a lot of options that you can use with campaigns. For example, you can include the begin/end date of the campaign, a Category you decide, and a photo/description of the campaign. For this tutorial and for most individual users, only the Name is necessary.
| 4. | When you send your letter, use a Group Log History to record sending the Support Letter. Select the special gift appeal on the Details tab. |

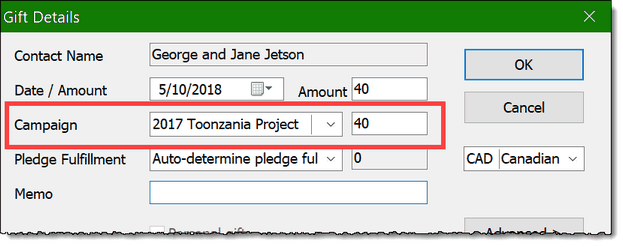
| 5. | When the gifts are downloading from the web, double-click on any gift that you know is a Campaign response, assign the gift to the campaign there; or, if you are manually entering the gift, select the campaign when entering the gift. In both cases, if the appeal is assigned before the gift is in your database, then the automatic thank you will say "SPECIAL" gift. |
If the gift is already in your database, you can Edit the gift and assign the campaign later. Alternatively, you can select the gift from the Gifts list on the TNT Tab. (The advantage of doing during the download is that the automatic thank you task will always mark as a SPECIAL gift and include the name of the campaign in the task description.)

Review Special Gift Appeal results
One of the great benefits of campaign tracking is that you can see God's provision for your special gift appeals over time. By going to , you can see every campaign you have run, how many letters went out, how many gifts were given, and the total of those gifts.
Exporting to Excel:
The Appeal Tracking box has an Excel button that performs two different functions depending on what you are doing at the moment.

No campaigns selected
|
Export the list of campaigns and the summary results to Microsoft Excel
|
Appeal double-clicked, History tab showing.
|
Export a list of all appeal recipients.
|
Appeal double-clicked,
Gifts tab showing.
|
Export a list of all gifts given in response to the appeal.
|
You can also export appeal giving trends to Excel.
| 1. | Press View Giving Trends |

| 2. | Select the Campaign(s) you want to export. |

| 3. | View the results, then press the Excel button to export. |

Amount in campaign column
|
The amount of this contact's giving in response to the campaign.
|
.00 in campaign column
|
You sent a letter to this contact, but they did not give a gift.
|
Blank in campaign column
|
You did not send a letter to this contact.
|
Other Tips on Campaigns
| • | When you select Manage Campaigns, you have two view options: "Normal View" and "Advanced View". Normal view displays 9 columns and Advanced View displays 22 columns. This does not impact what you can do with campaigns, only what you can see. |
Read More
Quick Guide: Create and Track Promises
Quick Guide: Using the Campaign Builder
Link Pledge Increases to a Campaign