1.View the Web Server Setup Console.
Menu Path: Tools | Web Server Setup Console
If "Web Server Setup Console" does not appear, you need to give yourself permission to view it.
Read More > How to Give Yourself Permission to View the "Web Server Setup Console"
2.Check the box for "Enable buttons for Web Synchronization" in the lower left corner.
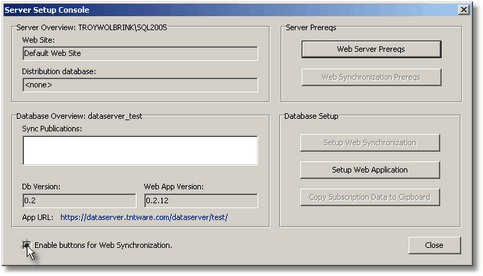
3.If you haven't already, run the Web Server prerequisites.
Read More > Setting up Web Server Prerequisites
4.Press the <Setup Web Synchronization> button.

5.Notice the name of the publication, the alternate working directory, the replication user and password that will be created locally on the server.

6.Press the <OK> button.
7.Read the next section about copying subscription data to the clipboard.
Read More > Copying Subscription Data Text to the Clipboard
Notes
Note: The "Setup Web Synchronization" screen is designed to allow being repeatedly without disrupting the availability of the Web service. However, unless you're making major changes, you should only need to run the "Setup Web Synchronization" screen only once per database.
Note: The URL that leads to your web application will be your base URL + "/dataserver/" + the name of your database. However if your database name starts with "dataserver_", than this portion will be removed. So a database name of "dataserver_abc" would result in a URL of https://www.yourdomain.com/dataserver/abc, but a database name of "my_abc_database" would result in a URL of https://www.yourdomain.com/dataserver/my_abc_database.
Note: SQL Server 2005 Standard was used when creating the screenshots in this section.