The "Query Designer" is available for editing many data source and source scanner configuration settings.
Read More > Custom Data Source
Read More > Custom Source Scanners
The Toolbar
Save Changes
|
Apply your changes to the underlying setting
|
Help
|
Get some helpful description of what the objective is of this query.
|
Test
|
Run the query and validate the resulting data against the target fields. No data is actually imported. But keep in mind that if the query is long enough, this test may take a long time.
|
Exit
|
Close this dialog. You will be asked if you want to save your changes if you haven't yet done so.
|
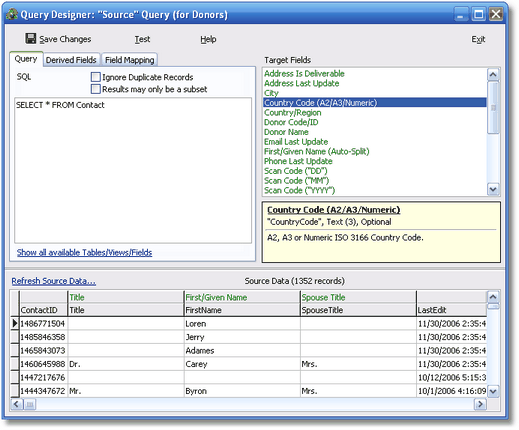
The "Query" Tab
On the "Query" tab you specify the SQL text you are going to use to query against your data source. You may right-click on where you enter the SQL text and the standard placeholder menu items will be available. You can click on "Show all available Tables/Views/Fields" to get some help in writing your query. You can click on "Refresh Sample Data..." to test your query and see what the results of it look like. You may refer to the "Target Fields" to the right to learn more about what type of data you need to return.
Read More > Placeholders
You have two check boxes:
Ignore Duplicate Records
|
If you know that your query returns duplicate records, you may indicate this here. When a record is found that is a duplicate of a that has already been encountered by this query, it will be ignored.
|
Results may only be a subset
|
If you know that your query is only a subset of all the possible data for this data target, you may indicate this here. This will tell the program to not delete a record, just because it can not be found in this query.
|
The "Derived Fields" Tab
Here you may derive additional source fields based on a concatenation of one or more original source fields and/or custom text. These fields will be added to the end of the original list of source fields.
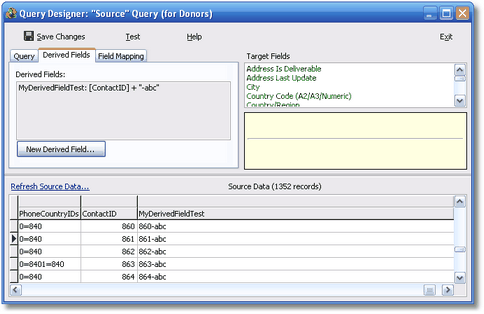
Describe the various types of derived fields. Troy?
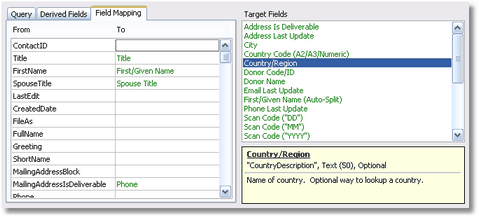
The "Field Mapping" Tab
You can drag and drop fields from the "Target Fields" list onto the "To" column of the field mapping grid. By clicking on any target field, you will receive a helpful description of it in the yellow information panel on the bottom right. This information panel will describe the purpose of the field, as well if it is required or not, and data type expected.