“Y poco después, Él [Jesucristo] comenzó a recorrer las ciudades y aldeas, proclamando y anunciando las buenas nuevas del reino de Dios; con Él iban los doce, y también algunas mujeres [...] y muchas otras que de sus bienes personales contribuían al sostenimiento de ellos.” Lucas 8:1-3
“Y vosotros mismos también sabéis, filipenses, que al comienzo de la predicación del evangelio, después que partí de Macedonia, ninguna iglesia compartió conmigo en cuestión de dar y recibir, sino vosotros solos; porque aun a Tesalónica enviasteis dádivas más de una vez para mis necesidades.” Pablo, en Filipenses 4:15-16
La obra de Dios se logra mediante las personas, y el método normal de la provisión de Dios para aquellos que están en Su servicio es a través de las generosas contribuciones de individuos e iglesias.
TntMPD facilita el recoger, guardar y buscar con respecto a una variedad de datos acerca de tus contactos.
El contacto Vista
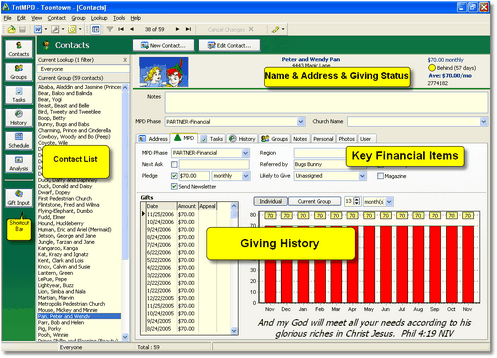
Atributos del contacto Vista
1.Barra de acceso directo
Consejo práctio: Alternar la vista
In the Contact View, use F2 & F3 to toggle buttons or contact list on/off. This is not as big an issue with today's high resolution monitors, but with low resolution monitors, turning off these two items expands the room to view contact information.
If the Current Group is not your whole contact list, you can toggle between the Current Group and "Everyone" by pressing the Lookup Everyone button.

2.Current Group of contacts
The name of the Current Lookup and the Current Group, with the number of contacts who are in the current group.
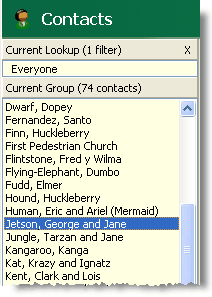
Consejo práctio: Palanca "Buscar todos"
You can view all of the contacts in your database by pressing a button on the button bar that looks like a funnel. Pressing the button again returns the Current Group to the previous lookup. "Everyone" is the default lookup upon opening TntMPD, but you can change that to one of three other options. (See Options for this.)

Leer más > Panorama de búsquedas
3.Name & Address Bar
Barra de nombre y dirección
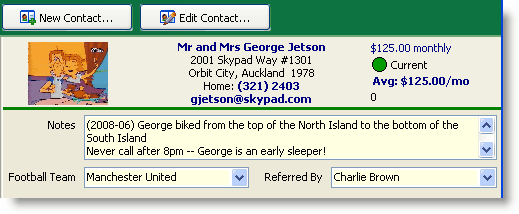
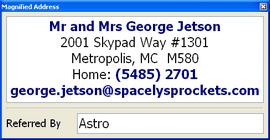
The "Name & Address Bar" is the area at the top where the selected contact's address, phone, and e-mail are shown. The amount of information shown is limited, so a longer address will push phone and e-mail down, possibly below where you can see.
The address will be bold and red if it there is an unresolved discrepancy for this contact's address or phone, or crossed out if it is "marked as undeliverable" (either manually marked or automatic if it is incomplete). Click on the name to edit the name & address. Deceased contacts will also appear, with an undeliverable address.
Leer más > Dirección y/o teléfono no corresponde con datos de la organización
Consejo práctio: Aumentar la barra de nombre y dirección con F12
Leer más > Administrar contactos
Consejo práctio: "Zonas activas" en la barra de nombre y dirección
You can click (or double-click) on almost anything in the Name & Address bar and act on it
•Picture [even if there is no picture]
•Name & Address [to edit]
•Phone number [to initiate a call task]
•E-mail [to initiate an e-mail using your e-mail provider]
•Datos de resumen: Fase, Punto del estado, Media mensual [abre la Pestaña MPD]
•Summary Data: Organization Account Number [opens View Organization Info]
Leer más > Administrar contactos
Consejo práctio: Tarea rápida para una llamada
Click on a contact's phone number in the Name & Address bar and TntMPD will automatically pop up a Call Log History. This only works if your TntMPD is set to NOT use the Auto-Dialer. The first time you click a phone number, TntMPD will ask you if you want to enable/disable the Windows Auto-Dialer.
Tip: Google Maps & WhitePages.com
Two bars in the button bar help connect you with your partners.

Show Google Maps
|
Maps the address of the selected contact, if possible.
|
Lookup on
WhitePages.com
|
Looks for information on this contact. This button is only displayed if the selected contact is in the United States.
|
Export to
Microsoft Streets & Trips
|
(On the Group Actions menu)
If you have Microsoft Streets and Trips 2007 or above, TntMPD will recognize that and provide a link to MS&T on the Group Actions menu.
|
Contact View Tabs
Pestaña Dirección
|
Home/Business/Other address, phone, e-mail, and greetings information
|
Pestaña Desarrollo
|
The MPD Tab is the center of financial information for this contact, whether they are a donor or not.
|
Pestaña Tareas
|
Pending tasks for this contact. Tasks for all contacts are displayed on the Tasks View.
|
Pestaña Historia
|
The History Tab is very similar to the Task Tab, except that it is showing completed tasks rather than pending tasks.
|
Pestaña Grupos
|
Individual membership in any Saved Group is controlled on this tab. All Saved Groups and all members are managed in the Groups View.
|
Pestaña Notas
|
A free-form notepad.
|
Personal Tab
|
This tab stores personal information that helps build better relationships with ministry partners.
|
Pestaña Fotos
|
Stores pictures for the contact. The top picture stored here also appears at the top.
|
Pestaña Usuario
|
The User Tab displays a few user-defined fields. Double click on the field name (such as <User 1>) to edit the name.
|
Leer más
Leer más > Paso a paso: Añadir o editar un contacto
Ejercicios Sesión 3: Datos sobre los contactos
1.Add Notes to the following contacts:

•Fred Flintstone: "Never call after 8pm because Fred hates having his TV shows interrupted! Wednesday night is bowling night."
•Cary Granite: "Turn left at the Quarry, then turn right after the Dino station. Fourth house on the right."
2.On the Personal Tab, add the following birthdays and anniversaries. (International note: TntMPD requires MM/DD/YYYY format):
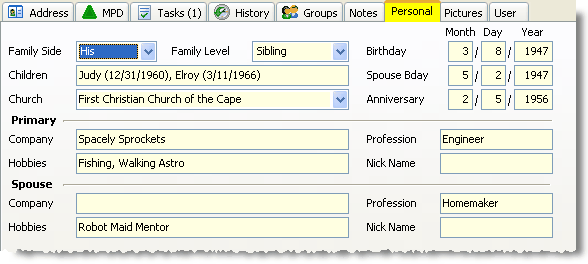
•Lucius Frozone: 7/13/1967; Leticia Frozone: 11/20/1968; Anniversary: 4/18/92
•Fred Flintstone: 8/14; Wilma Flintstone: 12/31
3.On the Personal Tab, change information on the contacts you entered above:
•Assign your first three contacts from Exercise 2 (Frozone, Mirage, Pine) to the First Pedestrian Church
•Assign Fred and his referrals (Rubble, Granite, Masonite, Slate) to the Church of the Rock
4.On the Personal Tab, add the following children (enter the information entirely in the Children field). The birthdates are just for your reference.
•Frozone: Jack “Frost” (12/31/1999); Lucy (12/21/2001)

•Flintstone: Pebbles (7/4/2006)
•Rubble: Bam Bam (7/3/2006)
5.On the Personal Tab, add the following employers in the Company field
•Fred Flintstone and Barney Rubble both work for Slate Gravel
•Lucius Frozone works for Ice Capades
6.On the Pictures Tab, add a picture (any picture) from your computer to Alicia Mirage
